


Disable Tower | Highlight Tower (Not Working for Chrome):
Details:
| Hero | HP | Damage | Range | Rate |
|---|---|---|---|---|
| Monk | 4000 | 4000 | 8100 | 0 |
| Hermit | 3000 | 7500 | 4600 | 0 |
| Warden | 3500 | 7000 | 4600 | 5500 |
Build Status: Public
Difficulty: Ruthless
Game Mode: Survival
Hardcore: No
Ruthless: Yes
Mix Mode: No
AFK Able: No
Mana Used: 0
Mana to Upgrade: 0
More Builds from Sleepy
Description:
This is probably a high stats Warden build. The lower the stats, the more precise the placements/angles have to be. I put my stats in for what I used, but I don't know what is required exactly.
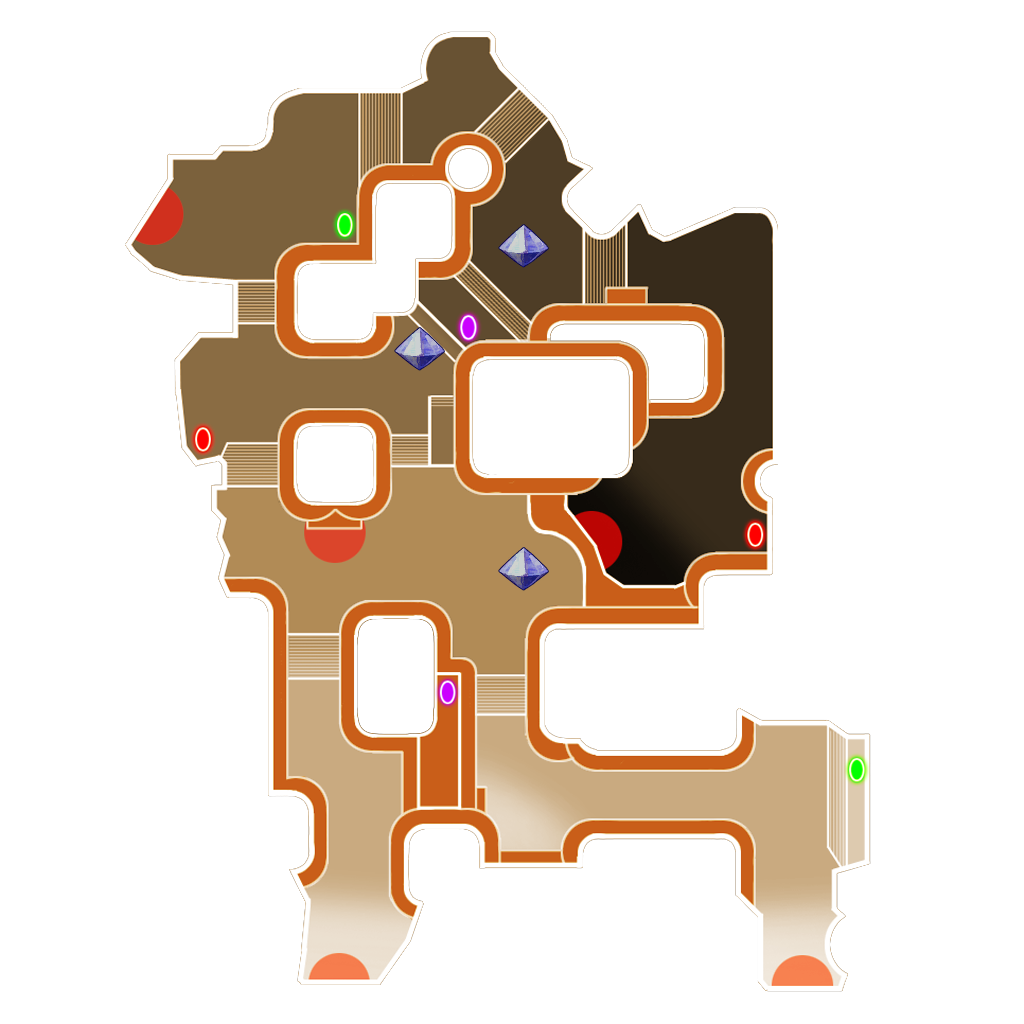
The Towers at Hint 1, 4, and 5 will take damage and be kept alive by the Forest Golem. You'll need enough durability and damage output for your towers to be indestructible while you AFK.
4 Summoners are needed except on Hint 5 when upgrading in the earlier waves. All Summoners have the App/Huntress guardian pets combo.
Upgrade in the following order:
- Hint 1 plus the Forest Golem
- Hint 4
- Hint 5
- Hint 2 and 3
- Whatever is leftover
Hint 1
- Place a Summoner so that it buffs the Forest Golem and the Hint 1 tower stack.
- The Forest Golem is far enough to the west that the ogres won't hit the crystal.
- The tower stack is far enough east that the Cloud Towers can target the spiders immediately when they spawn right in front of them.
Hint 2
- Place a Summoner between Hint 2 and Hint 3 so that both Cloud Tower stacks are buffed..
- The 3 Cloud Towers are built on the edge of the ledge in a spot where they can see all the way across the northeast corridor while also seeing a bit of the left side for any beefier electricity melee mobs.
Hint 3
- The 2 Cloud Towers are built on the edge of the ledge as far east as possible so that it can view as much of the northeast stairway as possible while also being able to support killing the northeast corridor mobs.
Hint 4
- Place a Summoner here.
- These Cloud Towers are pointed almost perfectly southwest while in a spot that will get both the south and the west corridors as much as possible.
- 3 Cloud Towers are very slightly tilted more to the west so that it consistently catches/aggros the ogres coming out of the west spawn, while also being able to attack the mobs coming from the south corridor.
- This is important as if the Cloud Towers aren't hitting the ogres to aggro them, then the west spawn ogres will head down the stairs to your Hint 1 tower stack.
- 2 Cloud Towers are very slightly titled towards the south so that they immediately catch any mobs that turn the corner on the south corridor.
- This is just to kill the south corridor mobs and ogres faster.
- 3 Cloud Towers are very slightly tilted more to the west so that it consistently catches/aggros the ogres coming out of the west spawn, while also being able to attack the mobs coming from the south corridor.
Hint 5
- After you finish upgrading, place a Summoner so that it buffs both the Forest Golem and the Hint 5 tower stack.
- This Summoner will be the missing Summoner when you are on your upgrader.
- The Strength Drain aura needs to be able to reach the west and south enough so that when the ogres from the west, southwest, and the southeast spawns turn the corner to throw an ogre ball, the ogres will be in the Strength Drain aura, greatly reducing the ogre ball's damage.
- The Ensnare aura is put a bit to the southwest and made smaller two times to help prevent the nearest spawn point by Hint 4 from being delayed / slowed down.
- You will still want enough coverage from behind to protect against the flying wyverns coming from the east.
Area of Hints 1, 2, and 3

Area of Hints 4 and 5 (picture of an older build, but you get the idea)
