Map: Valentine Citadel

12 billion Volts: way faster with DPS but can be tower kill

Author: y.Jousef

DU 0/140 MU 0/140

Sandbox Mode

Quickly test tower tweaks directly in this build view. Changes are not saved.
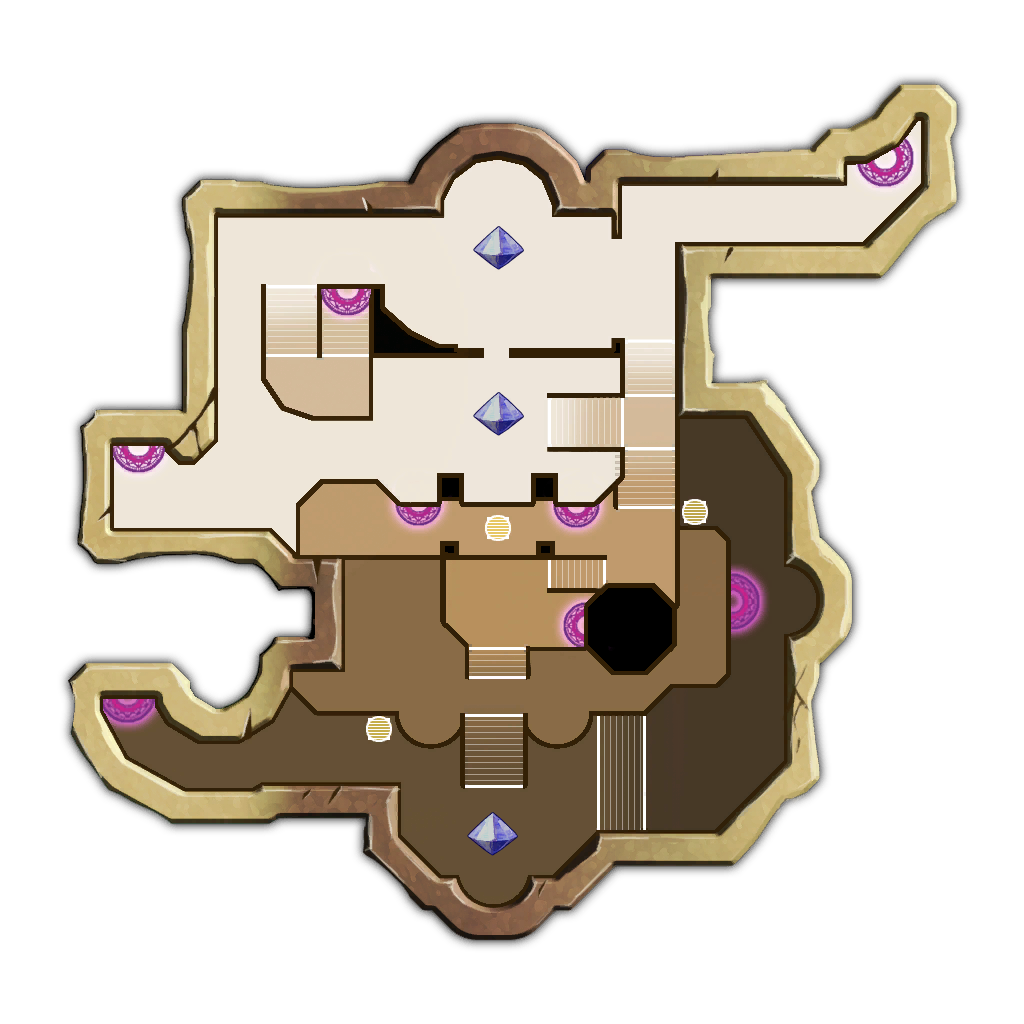
Hint focus

Click on a numbered hint marker on the map to zoom and highlight nearby towers. Double click on map to reset zoom.

    No hint selected.

    Tower Filters

    Highlight placed towers (Chrome limitation applies)

    Build Details
    Required Hero Stats
    Hero HP Damage Range Rate
    Apprentice 0 6000 3500 3500
    Monk 0 3200 7500 0
    Ev 0 8000 0 0

    Build Status: Public

    Difficulty: Ruthless

    Game Mode: Campaign

    AFK Able: No

    Mana Used: 0

    Mana to Upgrade: 0

    Build Description

    First of all, I bet most people had problems with "cupid arrows killing towers". That's basically why all those reflection beams are there, and if you ask why? IDK lol, probably the arrows hit either from above or somehow splash damage. I couldn't find a stable build that works every time even on YouTube, so I had to man up. The stats I used for this build are as shown, but it might work with lower stats (especially EV). The level isn't hard anyway if we ignore the problem of the boss wave.

    1ST wave: you have to build the buff beams, the reflection beam on top, aura stacks, golem, and the pylon, then switch to your app and also bring up your TB monk. Use your TB monk to collect mana and drop it using the n button, so it drops half the mana. Do that several times and quickly do all the LT stack next to the pillar on hint 1, then try to upgrade buff beams and pylon a little. (Note: keep a small distance from the pillar and the LT stack so you can build the reflection beams)

    2ND wave: focus on building the reflection beams, as your whole run depends on it. On hint 2, make sure the LT stack is surrounded in a triangle shape, wall from behind, and reflection beams on the sides (keep it as close as possible to the towers but not too close, like the distance between the LT and the reflection beams is the diameter of the LT (you don't have to be that precise actually lol)). Then do that circular reflection beam setup to make sure it won't be attacked from any direction, especially from above. And finally, build that last triangle, which will be your DPS standing zone. (I'd like to note that I prefer letting your TB monk stand behind the other pillar in hint 4, as Cupid might still attack it)

    What is left is just upgrading all the towers and keeping the tower boost to make sure everything goes well

    Boss Wave: Use a booster summoner with huntress guardians, and use phase shift to stack yourself with the LTs. Here I used a DPS jester but I actually prefer using a huntress (yeah i still didn't made my DPS huntress yet). If your HB stats on the TB monk is good, then i suggest turning on both once the bosses spawn. Stay inside the reflection triangle, and try not to die cuz your TB monk will be targeted. If your TB went off, keep an eye on sharkens cuz they might push the LT stack out. Finally, you have to shoot them both whenever its possible to make them target you.

    (Note: you might face a problem if you used 2 summoners, you must place them carefully so they dont get hit by arrows from the gaps. If you are not sure if you can do that, then just use the one with huntress guardians and bring any other character that will help in the boss wave)

    Hope this build works with everyone like how it worked with me, good luck and have fun.