


Quickly test tower tweaks directly in this build view. Changes are not saved.
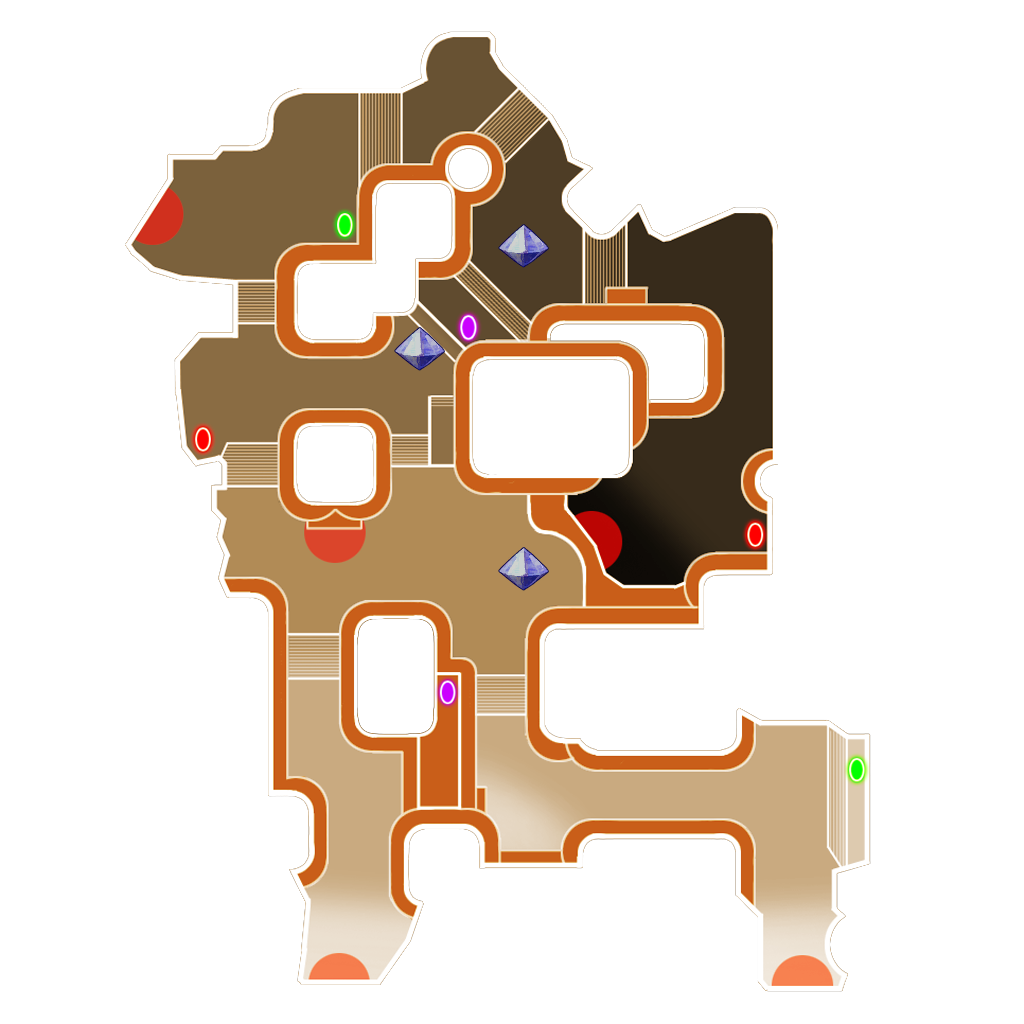
Click on a numbered hint marker on the map to zoom and highlight nearby towers. Double click on map to reset zoom.
No hint selected.
Highlight placed towers (Chrome limitation applies)


Build Status: Public
Difficulty: Nightmare
Game Mode: Survival
Hardcore: No
Ruthless: No
Mix Mode: No
AFK Able: No
Mana Used: 0
Mana to Upgrade: 0
More Builds from Plane
This is a basic LT build plus one DST.
1. Place 3 aura stacks
2. Place 3 buff beams: 6 DU, 4 DU, 6 DU.
3. Switch to adept, hit G. Place 5x LT and 1x DST on the south beam; grab chests and upgrade the beam to max. Move to the north beam, place 6x LT, grab chests and upgrade beam to max.
4. If your stats require it, upgrade the south aura and towers somewhat (maybe to level 1 or 2). AFK near the south LTs.
Tips:
- Aquanos goes fastest with 2 characters in, because the final wave group spawns earlier. This is true even if your AFK does nothing useful at all. So if you can manage to add an AFK jester with chicken each wave, sit them near the south LTs and you won't have to upgrade as much. Plus, you can use your AFK char to wheel kill% at the end of waves. (Use my config file if you need to set up abi2 on emus)
- Make sure buffs are roughly centered on the auras, otherwise lightning-immune mages may be able to kill the towers on the ends of the beams from outside the range of the auras. If your aura radius is low and the towers get hit anyway, add a pair of reflects on either end of the 6 DU buff beams to protect them from mages.
- The striker will help with aggroing ogres who attack the middle core. Usually the LTs will handle this, but if you do enough runs, once in a while an ogre can end up there at the end of the wave, and the LTs have nothing to chain off of, so the ogre will start pounding on your middle core. The DST makes it safer to AFK your runs.
- Because the seahorses are awarded at the start of 20, not the end of 19, you don't have to add the chars before wave 19 begins. Start waves 18 & 19 with only 2 chars in, and add the other 2 chars during wave 19.
- If your tower adept doesn't have resists, you may want to build everything before pressing G, and then switch to a DPS jester during waves, but this will slow down your runs.
- I only build 6 towers per buff beam so that I can place towers quick and sloppy during waves, but you can fit 7x2 towers on each beam. You have DU left over, so you could add a pair of strikers pointing east and southeast to finish off stuck lightning-immune mobs if you want to AFK (aim at "Hint 3" and "Hint 4"), but the strikers are too inaccurate to finish off the fish-wyverns consistently.
- Try to position your south aura stack so the ensnare doesn't overlap the spawns. It's tricky because it comes halfway between two of them. Depending on your radius you may need to move the stack a little bit south.
- Don't let either character AFK at the forge, because this will cause spiders to hold still. I have marked the best AFK spot with "Hint 1". This should be fixed in 8.3, but if you have a DPS pet equipped this is still a good place to AFK because it takes pressure off the LTs so you don't have to upgrade as much.
- Use the purple teleporter to return to the forge after placing aura stacks and buff beams. (If you are color-blind, this is the teleporter marked with "Hint 2")
- If you're using a tower adept during waves, you can use purity bomb OR use the extra 20 DU to build towers to finish off stuck monsters. I place strikers or fireballs and spam instant upgrade, then sell when the wave is over. Common spots for stuck monsters include circling fish-wyverns ("Hint 3") and ogres ("Hint 4"). The DST should take care of monsters that get stuck on the north side.