


Quickly test tower tweaks directly in this build view. Changes are not saved.
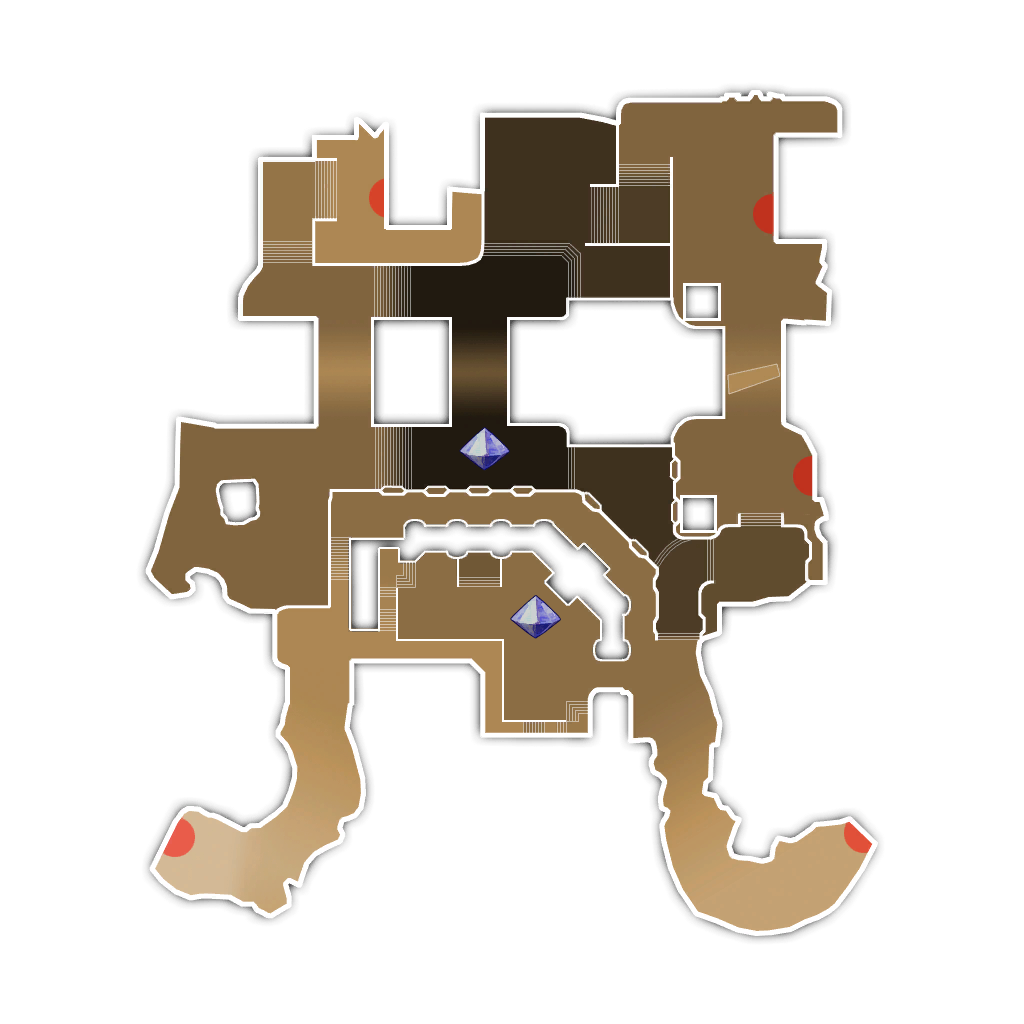
Click on a numbered hint marker on the map to zoom and highlight nearby towers. Double click on map to reset zoom.
No hint selected.
Highlight placed towers (Chrome limitation applies)


| Name | HP | Damage | Range | Rate |
|---|---|---|---|---|
 Monk Monk | 600 | - | - | - |
Build Status: Public
Difficulty: Any
Game Mode: Pure Strategy
AFK Able: No
XP Per Run: ~10 million
Time Per Run: 2 hours
Mana Used: 0
Mana to Upgrade: 0
More Builds from BlasiuS
TD Pure Strat. Pure Strategy is awesome for levels for a couple of reasons:
- additional characters do not change mob difficulty, so emulating 3 additional players doesn't make the map any harder
- You don't take damage, that means there's no risk for low-level characters
Pure Strategy also gives more experience compared to other modes, and even more so since you will always get the "no player damage" bonus. However the equipment quality is lower than on Survival (or even campaign), so this should really only be used to level low characters. I find this easier than doing the standard Glitterhelm Insane for XP, since there are less chokepoints and less crystals to worry about.
I used this to level my characters from 70 - 74. I had all characters but none of the stats on any of my characters was above 500. At this level I was still able to complete Pure Strategy on this map on Hard difficulty (there was only one issue with low stats, I'll go over that at the end).
Pure Strategy has a few changes compared to Survival Mode, which allows us to make some changes in the build we would normally use. However, it is also a lot harder because you are effectively blocked from using a DPS character, and can't attack with any of your characters.
- Enemies do not have elemental immunities, this means that darkness traps are not needed, and Strength auras are not needed...but if your stats are not very high (like mine weren't) then Strength aura's are still very important for their damage reduction. So the Strength Drains have been included in this build.
- Chokepoints where you would normally rely on your dps character now have to be fully able to kill all enemies by itself. So you can't really skimp on any chokepoints.
- The build at every chokepoint cannot allow even a single straggler. Even 1 mage outside the range of your defenses will infinitely raise skeletons and slowly chip away at a defense until it gets to a crystal and kills it. This means you have to be careful with barricade and trap placements (I ran into an issue where gas trap would cause enemies to be stunned outside of vision of archers).
- Most maps still have Ogres on Pure Strategy (they are much weaker than usual), but on Tavern Defense, there are no Ogres (at least not on Hard mode). This allows us to skip the spider minions that we would normally build, which are usually there just to web the Ogres so that they take double damage.
Wave 1: Put down all auras, traps, and non-buff beams. In addition, put a physical beam at ALL 4 chokepoints (Hint 1,2,3, and 4) After this you should have exactly 480 mana, this is exactly just enough to place all 6 harpoon turrets as well. At the end of the wave, sell ALL physical beams. They are only used on the first wave until you have enough mana to set up a minion wall. They become obsolete in later waves as Sharken will push them aside as soon as they have enough health to get within melee range.
Hint 1 and Hint 2: both of these chokepoints have the following:
- 8 minions that form a wall:
- 7 archers
- 1 mage
- a 5DU buff beam that covers all 8 minions
- a 2DU reflect beam
- 1 gas trap in front of the reflect beam (gas traps are needed at every choke to stun Sharken)
In addition, this crystal gets:
- a 5DU buff beam that has 3 harpoons on it
- 2 additional reflect beams to protect against projectiles (the 2 Hint 5 reflect beams near the crystal)
- an Aura Stack:
- Ensnare aura
- Electric aura
- Strength Drain aura
Hint 3:
- Aura Stack
- Reflect beam in front of it
- gas trap, in front of both beams
- 5 archers + 1 mage in a row on top of a 4DU buff beam (you will have to slightly stack your archers to fit them all on a 4DU buff beam)
- 3 harpoon turrets behind the minions
Hint 4: this will have the least amount of enemies but still needs a decent amount of defenses (if even one minion makes it through, you will lose your crystal):
- Electric Aura + Ensnare Aura
- Gas Trap + Inferno Trap
- 1DU Reflect beam
- 4 archers + 1 mage on a 4DU buff beam (these 5 minions need to form a wall that no enemies can slip through)
Hint 5: These are 4 additional Reflect beams. Their only purpose is to stop stray projectiles from hitting the crystal. Once you do survival/strategy a few times, you may notice at higher waves your crystal seemingly randomly dies in 1 hit with no enemies around, even when you have every chokepoint fully walled off. While there's no definitive answer as to why this happens, the most likely answer seems to be that an Archer or Mage bugs out and immediately upon spawning they fire directly at the crystal while still in the spawn point. These projectiles will go through walls, but a reflect beam will still block them. So the reflect beams need to be placed so that they protect from the direction of the spawn point.
On Pure Strategy, the mana is much more limited. Your upgrade priority should be:
- Buff Beams
- Auras (specifically the Strength Drain Auras, those will deplete the fastest)
- Mage Minions
- Everything else equally
Due to the reduced amount of mana from enemies, I recommend you start at Wave 1 on this map, so that you can get the most mana possible from chests. They will be immensely helpful in upgrading your defenses ever wave.
On Hard mode, there were no Ogres and the only special enemy that spawns the whole map is Sharken.
General Strategy
The general strategy for most maps is the following:
- A wall of archer minions with a mage minion to heal them, all in a single line on top of a buff beam. This makes a nearly impenetrable wall of minions that enemies cannot get through
- Gas Traps to deter Sharken
- A stack of Auras, which are immensely helpful:
- Ensnare slows enemies to a crawl, this gives your archers and harpoons enough time to kill them before they even reach you
- Electric Aura takes care of pretty much any small enemy that comes inside of it like goblins and kobolds (also being slowed from Ensnare makes them take more damage over time)
- If they still manage to make it to your defenses, the Strength Drain Aura reduces the damage they deal (and on non-pure strategy, they are helpful because they remove elemental immunities from monsters
- Reflect beams further protect your wall from any ranged attacks
- As back-up DPS, harpoons & lightning towers are generally the preferred method:
- Harpoons are just great all-around defenses: they don't take a ton of DU, they can hit air or ground, and they pierce
- Lightning Towers are good because they are the most damaging tower that can hit in a 360° radius, but they don't pierce
As long as you have enough DU/MU to do this at every chokepoint, you can do almost any map this way. After that, it comes down to how high your stats are.
*Note: with low overall stats, unless your Monk has very VERY high tower health, you will need to make sure you are repairing your auras every single wave. Especially the Strength Drain, that thing will deplete after 2-3 waves at the higher waves, and if it goes down it will take any buff beams touching it down as well, which could collapse your whole defense.
- Also related, depending on how high your tower health stat is on your monk, at some point the Strength Drain Aura near the top crystal will not even last the entire wave. My monk had ~500-600 tower health and my Aura was going to fully deplete around Wave 29-30. To get around this, you sell your strength drain aura then rebuild it. Then, during the wave, you can upgrade it (you can't repair during waves but you can still upgrade).