


Quickly test tower tweaks directly in this build view. Changes are not saved.
Click on a numbered hint marker on the map to zoom and highlight nearby towers. Double click on map to reset zoom.
No hint selected.
Highlight placed towers (Chrome limitation applies)


| Name | HP | Damage | Range | Rate |
|---|---|---|---|---|
 Huntress Huntress | 2700 | 6300 | 3900 | 3200 |
 Monk Monk | 3400 | 4300 | 5500 | 3000 |
 Warden Warden | 2200 | 5800 | 2900 | 2700 |
 Guardian Guardian | 6100 | - | 3000 | 3100 |
Build Status: Public
Difficulty: Nightmare
Game Mode: Pure Strategy
AFK Able: Yes
Mana Used: 0
Mana to Upgrade: 0
More Builds from Sleepy
I input the stats I used to roughly get around 6k top stat. I've tested a total of 4 AFK runs with this build and ran into no concerns that would end the run prematurely.
4 Characters:
- Summoner (Huntress/Monk guardian pets) on Hint 1
- Summoner (Huntress/Monk guardian pets) between Hint 2 and 3
- Builder Warden behind the Defender's Forge (southeast of the southeast crystal)
- Builder Trapper/Huntress behind the Defender's Forge
The Electric Aura at Hint 1 is placed slightly closer towards the tower stack so that it gets guard pet buffed instead of the other auras.
The Hint 1 tower stack and Buff beam are on the doorway/entryway overhang thing.
The Blue Arrows are the directions of the Cloud Towers.
The Green Arrows are the directions of the Sludge Launchers.
Build with your Guardian before you build with your Warden as you will want the Owl Nests down first for building ease.
If you have more than 8k range on your Aura Monk, you may need to respec the level up stats from TRange into TDamage instead. You don't want either of the Ensnare Auras to overlap on the spawn points.
During the 1st Combat Wave, have all the characters out and replace the builder Trapper with your upper.
Some waves the northeast Djinns or badly thrown Ogre balls will tickle the tower stacks at Hint 3 and 2. With the stats I have, they do about 2% health damage per attack, but never more than 20% total for the entirety of the wave. The damage is usually about 4% by the end of the wave if the Reflect Beam isn't placed well enough (close enough so a Djinn's attack bounces off if they manage to get an attack in, but angled well enough so that Ogre balls don't hit the ground right in front of the Reflect beam).
In some of the later waves, the west Djinns might reach Hint 1's tower stack. They may touch the tower 1 to 3 times with their attacks. Usually they don't get there.
To do this on even lower stats, you'll need to use 1 TB on the Hint 2/3 stack (so no AFKing sadly). You'll want to adjust the build to the following:
- Replace your Trapper with your TB Monk.
- Replace your Hint 1 Summoner's guard pets to be an App/Huntress combo instead.
- Remove the Sludge Cannon, Owl Nest, and Reflect Beam from Hint 3.
- Add a Proximity Trap northeast of Hint 3 in a position that still has it buffed by the Buff beam and Summoner guard pets.
- Add an Owl Nest to Hint 1.
- Add a Gas Trap hugging the west side of the northwest crystal.
- Move the Hint 1 Electric Aura to match the Hint 1 Strength Drain and Ensnare aura stack.
- The entire aura stack may need to be moved a bit more south if it isn't covering the walkway enough to protect the middle crystal from the southwest mobs that get by the traps.
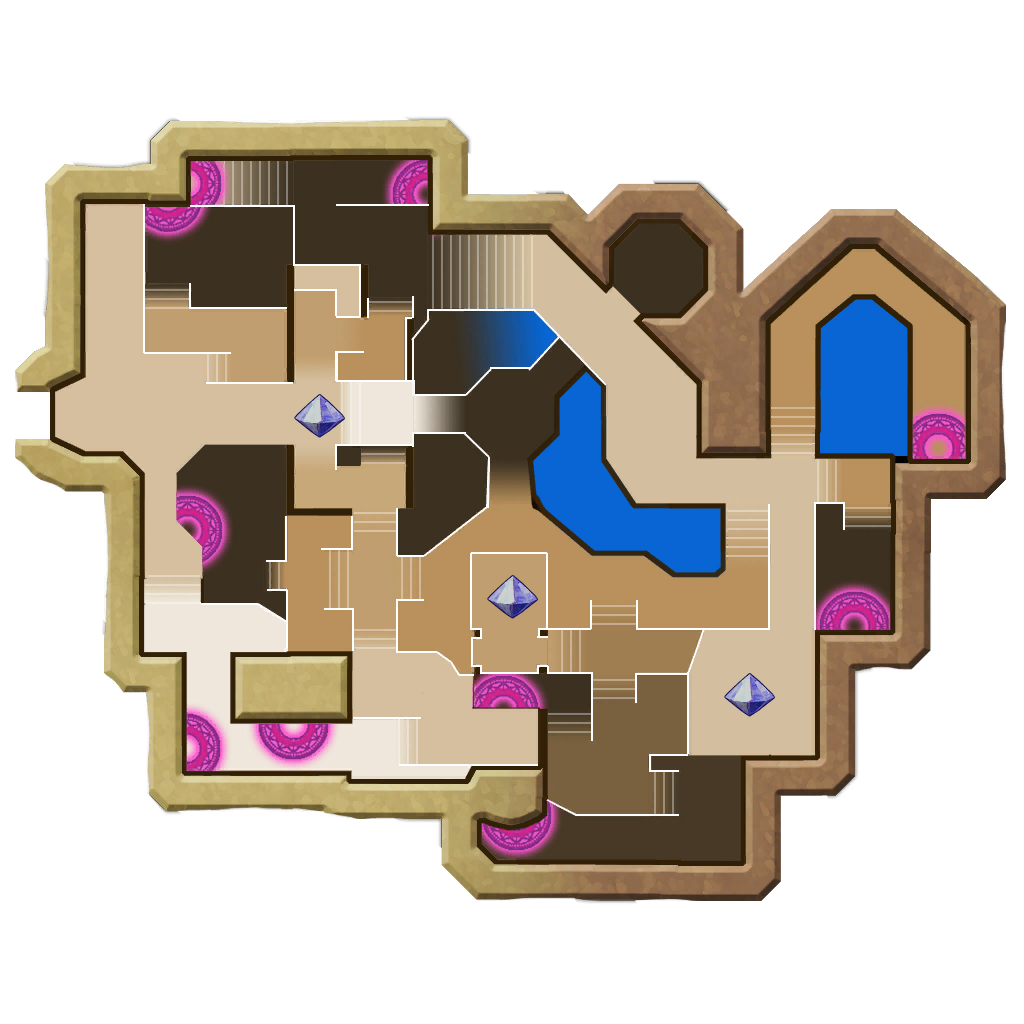
Screenshots of the Build:

