


Quickly test tower tweaks directly in this build view. Changes are not saved.
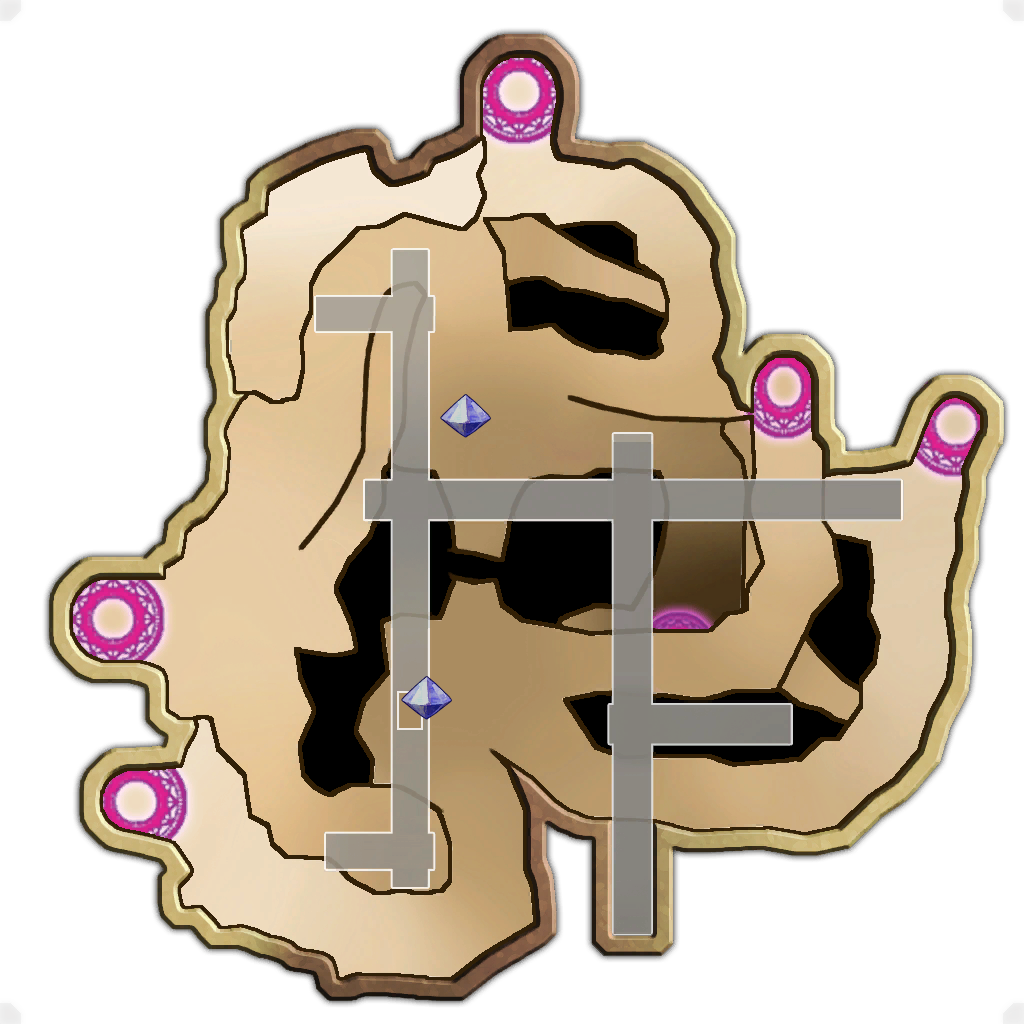
Click on a numbered hint marker on the map to zoom and highlight nearby towers. Double click on map to reset zoom.
No hint selected.
Highlight placed towers (Chrome limitation applies)


Build Status: Public
Difficulty: Ruthless
Game Mode: Pure Strategy
AFK Able: Yes
Mana Used: 0
Mana to Upgrade: 0
More Builds from Lytaneous
Hint (1) - Tower Stack the Mushroom Spore and Forest Golem so they are as far south as possible (Can't place on the bridge but you want the tower stack as far south as possible)
Hint (2) - Dual Lightning Towers take care of trash mobs
Hint (3) - Each Arrow Represents the leading edge of the 4 Cloud Towers. Aim 1 Cloud Tower so the Pointing North the left edge just barely goes under the bridge [Black Arrow]. Aim Cloud Tower 2 so Pointing North the Right Side Barely clips the Bridge Support so it can nuke ogres coming down the Northmost Spawner [Green Arrow]. Aim Cloud 3 so when Pointing South it's range just barely clips Cloud Tower 2 (Dijinn and Copters come down between the lowest spawner and the bridge support you spawn in so you want to just barely clip it [Blue Arrow]. Aim Cloud 4 straight South to handle the ogres/wyverns/dijinn that come in [Yellow Arrow].
If you start with Stack/Hint (1) as far south as possible, then squish Hint (2) and Hint (3) as tight as possible a 4 DU Buff beam should easily cover all towers. It also lines up so the 2 Wisp Towers can go under the North West bridge and nuke the incoming Copters/Wyverns/Dijinn.
Worked very cleanly with 3 summoners, 2 Huntress, 2 Monk, 2 Apprentice all stacked around the Lightning Tower in Hint (2).
Final Note. Hint (4) Reflect beam needs to be precise. Ogres from the the spawner on Hint (2) will toss snot when they get slowed so you need the beam to be angled to just barely reflect it. Likewise, the beam also needs to catch the wyverns coming from the south aerial spawner. It works if you place it so the bridge creates a line of sight and then you angle it as tight to the crystal as possible
Hint (5) is the same as Hint (4) but in reverse. It needs to catch ogre snot coming from the middle west spawner that go under the bridge, and also catch any loose flyers that come under the bridge. The wisps should take care of most of them, but there is a small window where a flying mob can come under the bridge and try to target the crystal. The ogres that come from the Northmost spawner should be close enough to your tower stack to target it before the crystal so no protection is needed there.
Most tower stats are floating around 6k major with 2.8-3.2k minors.