


Quickly test tower tweaks directly in this build view. Changes are not saved.
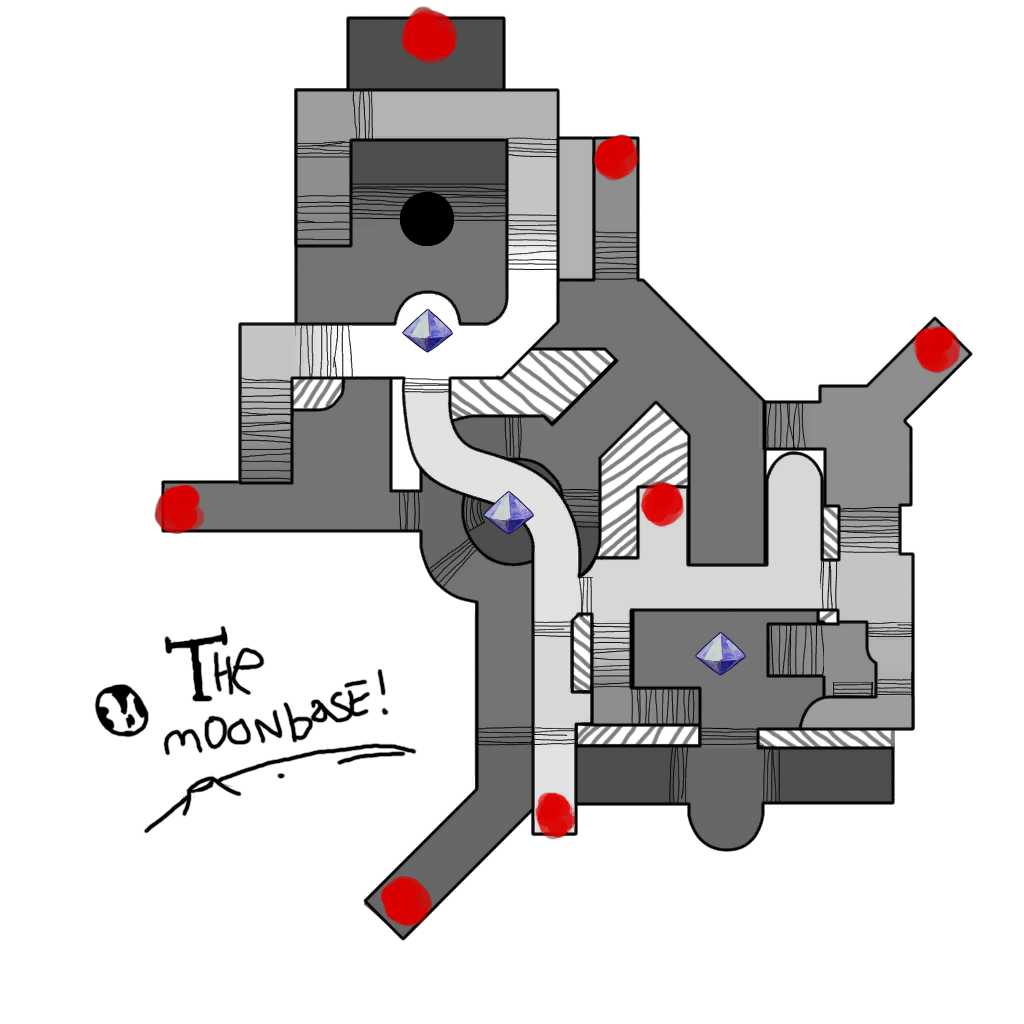
Click on a numbered hint marker on the map to zoom and highlight nearby towers. Double click on map to reset zoom.
No hint selected.
Highlight placed towers (Chrome limitation applies)


| Name | HP | Damage | Range | Rate |
|---|---|---|---|---|
 Apprentice Apprentice | - | 250 | 500 | 250 |
 Monk Monk | 100 | 300 | 600 | 300 |
 Series-EV Series-EV | 200 | 200 | 100 | 100 |
 Summoner Summoner | 300 | 300 | 100 | 100 |
Build Status: Public
Difficulty: Hard
Game Mode: Campaign
AFK Able: No
XP Per Run: 500k-25m Easy-NM
Time Per Run: 15 Minutes
Mana Used: 0
Mana to Upgrade: 0
More Builds from Ƭσяк
This is Part 4 of my personal leveling route getting characters from fresh to 74 in under a few hours depending on how much i focus or what limitations i put on my self. I hope that it will, in turn, help newer players get into the later game a bit faster and potentially keep their/your attention to the game longer w/o losing motivation for the earlier parts with a sense of direction. Takes from scratch upto 6 hours last I ran, but i focused a lot on the early game stats more than I should have wasting time.
The main reason to run this is the Fish in a bowl. From easy-hard the stats on fish will vary from easy giving about 50-70 stats, medium giving 200-300 stats, and hard pushing 350-500 stats at level 70. Once you get to insane and nightmare it will jump to level 74 or 100 if you go for treadmills. Once you get used to it you can also get a good chunk of experience in this level on top of rewards.
This is where you'll get a power spike for the 4 main characters you should have been leveling thus far. Series EV, Summoner, Monk/Initiate, and Apprentice/Adept not only that you will need all of them to progress into this build on top of that, stacking towers is a nice but not mandatory i will show you non-stacked and give modification options for stacked. Seeing as this level is incredibly easy regardless.
If you opt to level characters separate w/o controllers/emulators, then level them to 60 with EV swapped out before rounds on Part 2.
Stat prio while gearing/level points will be
Apprentice/Adept - range 2x Damage and Rate with HP being little to no prio before Hard, your towers shouldn't take damage anyway. For example 2 range 1 damage 1 attack speed 0 HP for towers. Hp will come with gear for the first little bit range is so much value up to about 500 then damage and attack rate take over imo.
Monk/Initiate - Range 2x Damage and HP with rate being put in every sixth range. For example 6 range 3 damage 3 HP 1 Rate for towers. Like the Apprentice/Adept range is so much value for towers early on and especially for Auras and Traps except these you generally want to get a range of 2000-4000 on before Damage takes over depending on who you ask.
Summoner - If you thought the range was going to be highest early on you're mistaken, while still very good for most heroes early on this once pretty much follows how it needs to later on. Damage and HP at a 3x the others. For Example 3 damage 3 HP 1 rate 1 range for towers. Most of the time they're used as walls anyways.
These stat priorities will change as you gear and should be an early game reference before 1k+ stats.
This will be run on Easy, Medium, and Hard. You should be able to go from easy to medium to hard with each new set of fish carrying you through. Follow the stat prio when giving fish to your heroes, if using split-screen 4 players you can get 4 fish and that will give 1 each to 3 of your 4 heroes with the EV falling off at this point, the summoner can have 2 fish so you'll want to give it 2. As you get fish from higher difficulties you can send old ones off to the EV.
If you're not using split-screen for added rewards/leveling you'll likely have to run this a few times to make the push into newer difficulties.
*At the moonbase point i'd highly suggest you create a tower boosting monk and level it over the EV while running moonbase Easy through Hard and higher to help clear faster and make the map less hectic. Just put in a bit of hero health for the first couple levels until you unlock tower boost then dump everything into that, use leftover gear with hero health, run, cast, and ability 1(highest prio) on it. Run this on hard until 70-74 depending on how challenging you want king's game to feel. While this map is pretty easy, easy is oddly enough the most difficult, atleast this most recent time around for me it was, but once you have a fish you power spike each difficulty with little overall challenge.
Hint 5: There are 2 buttons you need to press in order to access the DDR machine which allows access into the fishbowl room. in the far northwest corner is 2 buttons. 1 under the stars on the east wall and 1 on a thin rail up on the roof west side marked with yellow arrow line to simulate the thin black rail in-game. The door to the hint southeast will open and you will be able to go downstairs. Once per round you can acquire mana from this machine, I shoot for a score of 150+ on the blue/3rd highest setting on wave 1. Once you learn the machine if you choose the blue setting and get to 75 without missing an arrow on nightmare and not grabbing anymore will yield you with a 42 which is needed to acquire a treadmill on a treadmill over a fish. It is a level 100 pet so just for the future. Proceed down the tunnel and use your use key "E" by default on the fishbowl and you will get 1-4 at the end of the run depending on how many characters you have in the game.
Hint 1: I separated and rotated the markers, along with adding blue arrow markers for buff beam simulation. Place the towers on these as you can you have 5 DU to work with so you can make buff beams 6 if ur having trouble fitting them. One will be on the north side of the stairs packed into a small hole under a bridge once you get the towers in make sure the reflector is blocking them a bit north from ogre balls hitting them or you'll be repairing during the map. Alternatively, if you stack towers with a form of macro, like AHK or steel series engine you can just place all the towers here, if not continue to place towers on to the second buff beam at the bottom of the stairs. Boxed in with reflectors blocking potential ogre balls from the east up the stairs and south up the small set of stairs. DO NOT UPGRADE BUFF BEAMS UNTIL MIDDLE CRYSTAL DIES OR YOU RISK AURAS GETTING TO BIG AND GETTING EXPLODED ON.
Hint 2: Aura stack just east of the crystal. Slowing, Strength Drain, and Electric.
Hint 3: Minion stacks mainly meant to block ogres from getting to your towers, so-so damage. The slanted 3/northern minions are a bit tricky to place since they're to be placed under the bridge so you'll need to mouse wheel in your camera or not use overlord to build. Place them directly behind the northernmost reflector so they're protected from ogre balls.
All of this should be built before the wave starts and northern and central crystals explode since you lose MU and DU when a crystal explodes. There is 7 chests giving 140 mana per and an additional 4 by the fishbowl that does not respawn. 980 mana or 980 + 560 in the event you don't meet the 2550 mana required from the DDR machine.
Keep an eye on defense health as stats listed are quick reference points to shoot for Hard. Easy can be down with extremely low stats which makes the fish great for pushing into higher difficulties. Feel free to start leveling much-needed characters once your 4 mains are 70+, in terms of for solo play or multiplay it helps to even have characters needed to quickly perform any role such as. I recommend a trap placing huntress, this will help get you into much better leveling areas earlier with gas traps if you're planning on leveling more characters to perform various roles. A Trap huntress will easily allow you to crack into embermount for significantly greater experience gain on Hard - Nightmare.