


Quickly test tower tweaks directly in this build view. Changes are not saved.
Click on a numbered hint marker on the map to zoom and highlight nearby towers. Double click on map to reset zoom.
No hint selected.
Highlight placed towers (Chrome limitation applies)


| Name | HP | Damage | Range | Rate |
|---|---|---|---|---|
 Apprentice Apprentice | 1000 | 4000 | 2600 | 2800 |
 Huntress Huntress | 1000 | - | 2500 | 1500 |
 Monk Monk | 3000 | 3000 | 4000 | 2500 |
 Series-EV Series-EV | 1500 | 2500 | 1800 | 2000 |
 Summoner Summoner | 4000 | 2500 | 1500 | 1800 |
Build Status: Public
Difficulty: Nightmare
Game Mode: Survival
Mix Mode: Yes
AFK Able: No
Time Per Run: ~90 Minutes
Mana Used: 0
Mana to Upgrade: 0
More Builds from ForeverMaster
NOTICE: This build is not designed for Redux, especially on Ascension. Cyclopes and the fact Wasps are now weak to fire damage instead of Lightning Towers require a different build to deal with them.
V2 UPDATE, WIP: After some more research into DD1's mechanics, this build has been optimized more to speed up waves without compromising loot. It turns out that Mix Mode practically makes no difference on how soon the Survival armor quality multiplier maxes out. On this map (as well as Winter Mire, Magus Citadel and Omenak), this cap is reached by Wave 23.
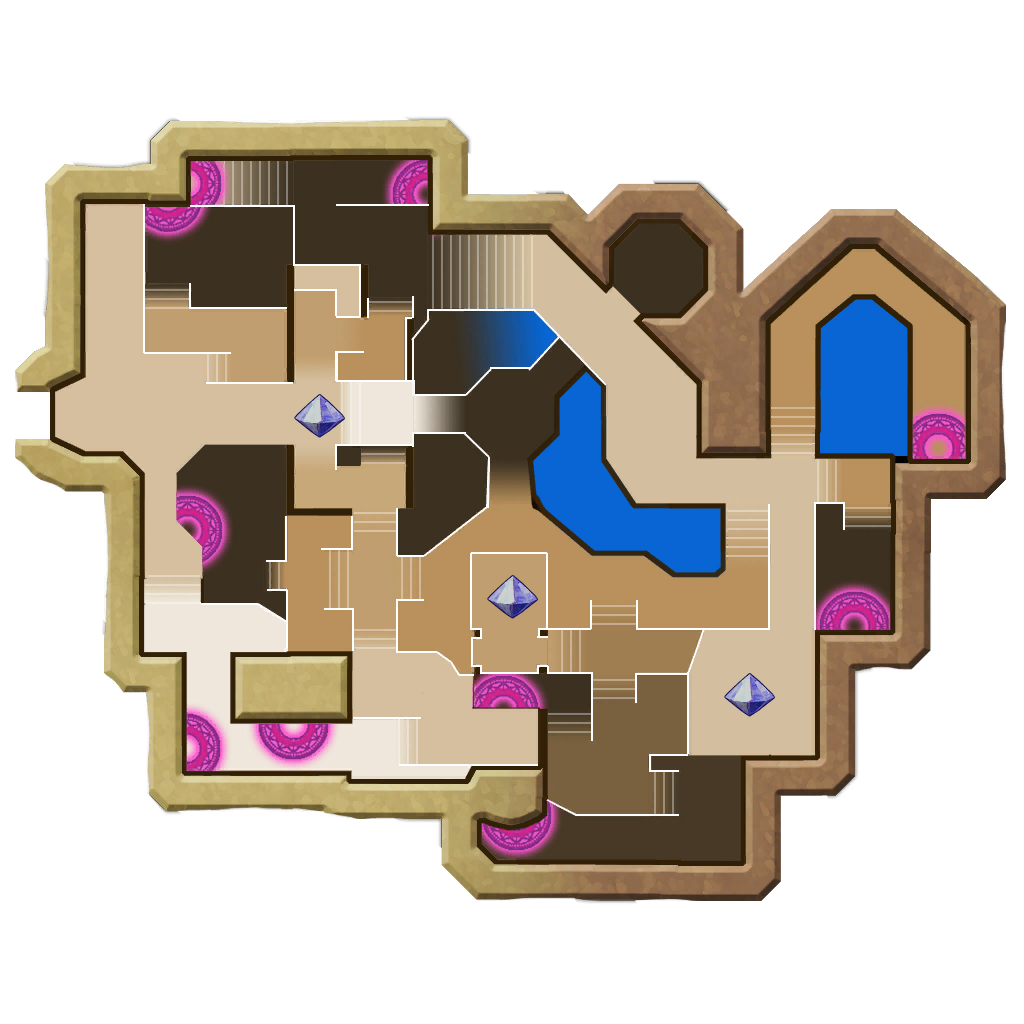
Infested Ruins: one of the best maps in the game to farm armor. Everyone should switch to Summoners once everything has been fully upgraded to maximize armor drops. Start on Wave 19/20 if possible. You ideally want to have everything fully-upgraded by the time you reach Wave 23; this is the point that the armor quality multiplier maxes out. The green arrows represent Wasp and Djinn flight paths; yellow is for Goblin Copters. The presents are Eternia Crystals, not part of the build.
With this build, you can AFK through all, if not most of the waves (after upgrading) which can last up to 5-7 minutes each. The combat times depend on enemy counts, the lifespan of your auras and the stats of your mage towers. Remember to repair auras after each wave and the traps at least every few waves. All three Buff Beams are 4 DU long. Since this build leaves 2 DU to spare though, you can afford to extend the middle Buff Beam to 5 DU and the east-side reflector to 2 DU long. Doing this will give you more space to buff the central auras and place your mage towers. The boost summoners will also have more room to stand safe from Harbingers and ogre snot balls or take negligible damage from them.
Hint 1: Semi-circle wall of Archer Minions with no gaps for Ogres to fit through. Move mages up against/inside the crystal (through Overlord Mode). The minions can be a little closer to the central crystal than usual. All of the non-copter Ogres on this map are minis whose clubs don't reach as far as full-sized Ogres.
Hint 2: You need to build three (or two) stacks of mage towers. From north to south: 5 Lightning Towers, 2 LTs, and 4 Deadly Strikers. Bring at least two boost Summoners, one with an Apprentice and Huntress Guardian to power-up the DSTs, and one with a Huntress and Monk Guardian to power-up the LTs. I am using 4 DSTs instead of three, two of which are aimed to the west to kill the Djinn and Harbingers from there more easily.
Hint 3: The Darkness Trap in the southwest corner gives LTs an easier time to aggro the mini ogres that'll spawn over/around it. The one to the north is not necessary, but it will make the waves go by a little quicker and save some lifespan out of the nearest Strength Drain Aura. With a big enough Trap Radius, it can cover three spawn points at once. The Gas Trap stuns Sharken shivers from the lower northwest spawnpoint, as well as Djinn trying to de-summon it or its Buff Beam. The southwest Darkness is safe from Djinn to upgrade, but NOT the optional one at the northwest spawnpoints.
Hint 4: While a Darkness Trap placed against this east wall is useful, I have omitted it because Djinn keep de-summoning it, even without upgrading it.
Misc. Notes
- If you are having problems with ground enemies reaching the east core, exchange the northwest Darkness Trap for a Gas Trap covering the walkway (but not the spawnpoint next to it.
- Open the chests each wave while everyone is a Summoner. They have an increased chance to contain ultimate-quality armor.
- Guardian pets won't be necessary by the time your builders' stats are super-high. However, the support pets are still recommended to speed up waves.
- If you make it to the end (Wave 35), one option when you are playing solo with four heroes (via home console controllers and/or controller emulator) is to swap heroes to target a specific honey weapon upon completion, such as all squires/countesses/barbarians for the Honey Sword or all mages (including your builder) for the Honey Staff.
- Interestingly, the wasps which are exclusive to this map take 8x damage from Lightning Towers and 0.4x damage from all other defenses.